Wednesday 14 November 2012

Steampunk Project - Complete

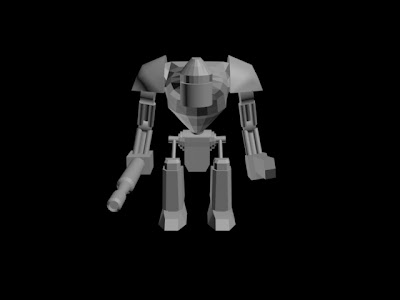
With the deadline just a couple of days away I have finished my first second year university project with time to spare.

Even though this was my first foray into 3D animation I am extremely pleased with my finished result as well as astounded at the ease with which I was able to animate after laying all of the groundwork and rigging my character.

Having entered my second year unsure of a more specific area of the industry I wanted to head towards, I am much more confident after completing this project that animation is definitely something I could easily see myself continuing with in the future.

Whilst I find some parts of the animation pipeline tedious or time consuming I understand their importance as well as how having one aspect of an animation be weaker than the rest can still bring down the entire piece.

I can say without a doubt that the most enjoyable part of this project for me was the animating and bringing the model I had made to life with the simplest of movements.

Here is my completed animation.


Wednesday 31 October 2012

Steampunk Project Progress

Over the last week I have put the majority of my time into my website project with that having a much sooner deadline, but with that now finished I have jumped right back in to 3DS Max and got back to work on my robot.

I am now at the stage where my robot is almost complete with both arms rigged and just some final touches and finger attributes needed to be added to the left arm.
One adjustment I have made to my design was the left arm. After looking at more of the video tutorials provided and experimenting with some rigging myself I have altered my left arm from have two sections, an upper and lower, to three, giving it much more flexibility and possibilities when it comes to the animating.


As well as finishing of my main robot I have almost produced its opponent, a simple damaged hand robot.
The main challenge that this robot will produce is animating it. I intend it to walk on its fingers with the wrist and lower arm section that remains positioned vertically above it, similar to 'The Thing' from Addams Family.

To get it much more smoother animation effect and more control over it I have given each finger an IK solver that will let me pose it and move it in a much more precise manner, over applying standard attributes like the main robots fingers.

Below is a quick test to see how it looks animated and planning out timing for how it shall move around.


Monday 29 October 2012

New Site!!

As part of a university project I was required to set up an online portfolio for employers and to have a stable online presence for future needs.

 With that in mind I have purchased both a domain and web hosting to have a fully operational website. 

Whilst a large amount of it is temporary and subject to change I am really happy with this step and more so because I hand coded the vast majority of the site in Dreamweaver, using some online guides for JavaScript and certain features that I wanted to achieve. I feel much more happier now that as my portfolio grows through more university projects and personal work, I will have a hub where all of this can be stored and that also links to the rest of my accounts.


 So without further ado I present : nickrood.co.uk

Wednesday 17 October 2012

Steampunk Robot Shoulder Joint Experimentation

For my Steampunk robot project I have been looking at a lot of means for each element of it to connect to each other. After a number of sketches and different ideas being tossed around I looked at Portal 2, in particular the robot 'Atlas' for how his arms have been attached to his body.


His arms appear to be attached by a set of tubes or hydraulic pipes that would most likely allow it to recreate more realistic shoulder movement.
From this I decided to incorporate them into my own robot with it having pipes connecting to the arm that would both allow for a realistic movement as well as passing fuel or other product down the towards the arm if it were in fact a fully functional robot.


Upon deciding this I then had to work out a way to animate this correctly with each of the pipes moving realistically with them deforming and flexing slightly like really pipes.

With some help I came across the hose tool which would allow me to make just what I had intended with each end of the hose being attached to a 'Point' helper object that would in turn be linked to the shoulder segment and body.

Having done this I produced a few viewport grabs to ensure it worked correctly and gave the intended look.


Even though I am happy with the final result I intend to still experiment with a more effective way of creating this effect, looking into what I can achieve with linking and other tools.

Saturday 13 October 2012

Steampunk Chess Robot Project - Iterative Development

Over the past two weeks for this project I believe I have organised my work in a way that will benefit my work for it later on. In past projects I have been keen to jump on the software and get modelling or have one idea I love that clouds my vision of any other possibilities.

With this project however I have took an aspect preached to us in the first year of university to heart - 'Iterative Development'. 

Rather than like previously where I ran with a single idea, I have considered several different ones and sketched out simple designs that showed the concept I was going for.  I don't think it was until the end of the first week that I actually opened up 3Ds Max and began modelling an idea and for this I am pleased. 

Whilst I don't have as much solid progress to show in the form of models and the like, I am highly confident in the stage I am currently at and am comfortable enough with the software that I will be able to produce my final model quickly using reference from sketches I have done and inspiration images I have gathered.

There were a several different aspects I had to consider when designing my robot character including its size and how it would move.

Through toying with different ideas my final idea is to have a character suspended from a rail that it can move along similar to 'Wheatley' from Portal 2, with large bulky arms that hang down below it and are heavy for it to lift, and a cage like body that has metal plates over it with some of the internal mechanisms exposed, adding more detail to it.

Simple sketch similar in style to tutors example.

Sketch considering a design for robot hand with 'furnace' and vents on back of palm.

Idea for exhaust vents or chimneys to be located on the robot.

More detailed sketch of a static arm incorporating the hand design and other steampunk elements.


Robot with body with an arm reaching over the top, back exhaust pipes, and exposed front mechanisms.

More complex design for a robot with an arm that extends out of side panels, switching between each side for each move. Exposed front mechanisms and back exhausts incorporated as well.


First suspended robot drawing.

Much more advanced suspended robot drawing incorporating several previous design elements.

Wednesday 3 October 2012

First 2nd Year University Project

With my first lecture complete I am immediately back into a good university mind set and am feeling very confident about my first brief.

Brief:
 'Design, build and animate a Chess Robot and its environment in the steam punk visual style that can apparently think, decide, pick and place objects. Your piece should focus on a limited "set" as quality and relevance is more important than volume, think elegant still life that moves.'

Being a big fan of the steam punk and general industrial visual style I am looking forward to replicating it for this project as well as beginning to learn character animation, which with my first lecture based on it done, believe I will be able to experiment a lot with expressing emotion of a mechanical character through minor visual cues.

My initial ideas so far have mainly focused on the general look and structure of the robot character, producing some sketches planning out the general shape.

Currently I am considering producing a large, cumbersome robot character that will have difficulty with the precise movement of playing chess, thus allowing me to experiment with showing different emotions such as frustration and anger from the robots ham-fisted attempts at moving each piece, knocking others over in the process.

Whilst this is an idea i'm currently leaning towards, I still intend to experiment with different shapes and sizes of robot e.g. a smaller one, similar in size to a chess piece, that walks across the table straining to pull each piece to the desired space.

As well as the robot I also intend to design a means for it to move around, rather than it be on a static 'plinth' where it reaches over the table. This 'plinth' idea might be suitable for the heavy robot design as it would act as a counterweight to be attached directly to the table so it would not fall over.

All in all I am glad to be back at university and feel infinitely more productive then I have been over the summer.

Friday 7 September 2012

Over the Summer

Whilst I haven't been as productive over the summer as I had intended to be, I have still been able to get a lot done. Although most of what I have done is brainstorming and idea generating for future projects, I did make some simple 3D models that I will continue to build upon as long term projects, hopefully becoming more diverse and detailed as I become more adept in the software.

One project I did complete which will be beneficial for my return to university is learning the basics of Autodesk Maya. Rather than follow a simple guide of the basics of the software I looked for an interesting tutorial that would be suitably informative to teach me the UI and hotkeys of it. The tutorial I chose was one by Sansar Tripathi titled - Modelling and Rendering a Simple Robot in Maya using V-Ray.

Tutorial Link: http://lesterbanks.com/2012/02/modeling-and-rendering-a-simple-robot-in-maya-using-v-ray/

I found this tutorial to be very useful for a beginner to Maya and the pacing allowed to follow what he was doing whilst getting an understanding of the different tools. It also followed a different approach to modelling that I haven't used before, which would have made a lot of previous projects I have worked on simpler and quicker.

I am very pleased with the final result from the tutorial as I was able to apply some of my own ideas to the final product to make it separate from the example model and learnt a bit about texturing with V-Ray.

I did have some issues during this project however they were mainly related to being new to the software, the first being the fact I was only able to render my work in 600x450 resolution due to only having a demo version of V-Ray for Maya. This was disappointing as the quality of the final image was particularly low and I feel didn't do the model justice.
The other issue is something that I hope to remedy over time, that being the lack of stock textures to utilize when I was adding the reflection effect to the model. Instead I used some free online HDRI maps that I thought were very impressive and did the role they were needed to, although I intend to produce my own in future, so they are made to fit the task.

Abstract HDRI Maps Link: http://smashmethod.deviantart.com/art/High-Res-HDRI-Map-Pack-2-ab-10036562


My intention from now is to continue with what I have been doing over the summer and generate more ideas for little projects, but also attempt different things in the software as well, including both tutorials and personal projects. 

Friday 29 June 2012

Google Sketchup

Google Sketchup is something I have heard about a lot as being an effective tool for game concept work but have never inquired to try it out for myself. Having glanced at an article for it in a magazine the other day I decided to take the time to investigate and I am very pleased that I did.

Immediately as I started it up I was able to get to grips with it within 5 minutes, baring similarities to most other software with basic shape drawing tools and movement controls. With the entire thing being snap controlled it is very easily to make a simple shape quickly and then using the variety of other controls to edit it future and turn a box into a house or other shape. I really enjoyed using the software as I found it simple to achieve something and with just time and a plan can see it being a much preferable alternative for me to produce basic models, rather than 3Ds Max, which at sometimes I find to be fiddly to produce some things.

The only gripe I currently have with Sketchup and I assume, one that can be easily solved through further exploration, is the lack of precision. I find myself undoing something repeatedly to get a line in just the perfect position as it will never quite want to go where I want it to.

A quick 10-20 minute session with it allowed me to produce what I would hope resembled a barn house, something that would take me an hour in 3Ds Max from simply, second guessing myself on every aspect of it as I went along.


In essence the main reason I really enjoyed using Sketchup and will most definitely use it again, is its basic. Whilst with 3Ds Max and other software I try to make each part perfectly modeled and shaped, Sketchup removes this necessity and just allows me to make the basic shape of a structure and build on it as I go.

The final point about Sketchup is its community sharing feature that allows you to quickly search for a particular model and find hundreds of examples made by other users that can then be downloaded for your personal use, or just as reference if you are working on a similar model.


Overall though I will certainly use Sketchup again and see what is possible with the models once one is completed, e.g. importing it into Photoshop to add a backdrop and produce my own concept art piece.


Thursday 28 June 2012

Ghosttown 3Ds Max Plugin

Having a large amount of spare time now until October when I start my second year of university I intended to get stuck in with 3D work and learn the software inside and out to have a good head start when I went back. Whilst not being as motivated as I had hoped I have had time to look into a few things and brainstorm some possible future projects for when the time is right.

In particular I was interested in looking into plugins and extras for 3Ds Max that would help me produce things in a much more efficient manner, for instance, procedural generation addons.

Ghosttown is one of these. With a few button clicks you are able to produce a very nice city block complete with high poly facades and textures. All inbuilt into the program there is also a lot of room for editing where you can add your own textures as well as completely edit the generated model, as with any other in Max.

I only had a brief look at this, but I could see the potential for using it to make a simple backdrop for a scene in a shorter period of time or a fully detailed cityscape usable in a multitude of situations.


It is currently a work and progress with it being updated regularly and shows a great amount of promise. The latest test video shown by the creator displays the amount of flexibility and detail achievable from small amounts of fine-tuning along with the future inclusion of road generation.


I will hopefully be able to look at this more and gain a much better understanding of it over the next couple of months.

You can download Ghosttown 0.317 Lite Beta here to try out for yourself : http://www.kilad.net/GTForum/viewtopic.php?f=2&t=2

Wednesday 23 May 2012

Visual Essay Complete!

At the start of this project I was rather skeptical regarding the necessity of doing it and wondering how it would benefit me, other than taking up a large chunk of my time, however with it now behind me I look back and can see how it has been helpful in improving my understanding of what I want to do.

Making me focus my attention on the specifics of my interest in 3D and animation I have gained a clearer idea of the area that appeals to me most as well as finding a large quantity of inspirational and high quality professional work in my attempts to find practitioners to discuss.

As well as gaining a better concept for a future goal on this project, I also took it upon myself to use the opportunity to advance my 3D and animation abilities and produce a piece of work I can honestly say I am proud of. I feel as though I have achieved this as, although my great schemes were foiled by the curse of extensively long rendering times, I still am happy with the result and was content with leaving it how it was, resisting the urge to reproduce the entire 3D section, incorporating steam, puddles and generally making the scene look much gloomier and dank as well as fixing those niggling things that only I notice.

Here it is, my complete visual essay


And now I hope with this project finished and my summer technically started I will be able to relax and work on some of my own ideas I have been brewing for a while.

Sunday 20 May 2012

Further Visual Essay Progress

With the deadline looming for this project I have made a lot of progress with my animation. Having been faced with dauntingly long rendering times for the 3D portion of the project, reaching close to 450 hours at its max, that section is now behind me, having produced a scene I am happy with to use at the backdrop for my animation.

Below are some screenshots showing the development of the 3D scene from modeling, to finished with textures.


One thing I am disappointed about is the noticeable difference between the above and below image in terms of having much stronger shadows in the above one. This is down to having to use lower settings for the shadow mapping to avoid extremely long rendering times, which I feel makes the scene lower quality, but still suitable for what is intended.


As well as the finishing of the 3D section I have begun work on the editing and compiling of video clips and voice-over that will make up the essay part of the project, explaining my decision for choosing virtual environments.

Last but not least I have also improved my intro scene, making it higher quality and smoothing out the timing issues to be added to the beginning of my animation once it is complete.


Monday 7 May 2012

Visual Essay - Progress!

Over the past couple of weeks I have had minor developments on my visual essay project with a number of ideas being considered, reconsidered and then scrapped due to unimpressive results or the inability to achieve them at my skill level.

Even with this I have made some progress in refining my concept of how I want my animation to look. Firstly I know that I want to take the opportunity whilst working on this essay to improve my ability with 3Ds Max and gain a better understanding of the areas I haven't had much contact with.

I know for my animation I will have a single background scene following a steampunk theme as this will be very mobile and active, allowing me to experiment with animation and particle effects such as smoke/steam in 3Ds Max.
To implement a way of showing video and images in my animation that fits in with the whole theme and doesn't appear out of place I have designed and started modelling a small, flying robot that shall be attached to a TV monitor floating around the scene. This monitor shall take focus when necessary to display video footage and have also considered other mechanisms that can enter the scene to show images rather than overlaying them directly onto the screen.

                                                      Robot Untextured

                                                         Robot Textured

For my introduction I have looked at a couple of different possibilities involving animating the text in someway. My original intention was to have the text be formed from separate shapes, using the 'Morpher' tool, in a similar fashion to the Transformers title sequence, however I wasn't pleased with the finished result so, looking at other methods I could use, I followed a tutorial to produce an effective exploding text animation utilizing a number of different tools including particle effects and forces such as gravity. I am much happier with the end result and believe that this will be perfect for the introduction to my essay.

The only points I am still considering are musical accompaniments for the intro and other parts of my animation, as well as the level of texture detail I am going to attempt, as I want it to be a high quality scene with a number of animated parts.


Monday 12 March 2012

3D Virtual Environment

Throughout my animation project I have had mixed feelings about my decision to follow this pathway in my second year of university. The tedium of sitting at a computer screen for hours on end has been difficult to cope with, waiting several hours for my final work to render and having headaches and eyestrain took their toll, but through all this my work is finished. 60 seconds of animation having a camera fly around a 3D environment, an envrionment I have made and although with its rough edges and little issues it still is something I can say I am proud of.

At the start of this project after the first lecture I knew this is what I wanted to do. I was happy to wait hours for my animation to render, not like with a film, and would sit at a computer screen all day modelling and animating, not noticing the time pass, whilst constantly watching the clock during the coding of a website.

The project itself has been a great learning experience for me, helping me get to grips with the basics of 3Ds Max as well as probe into some of the more complex tools it has to offer. I feel that the models I produced are of a low quality with simplistic extrudes and bevels done for the majority of it, however after adding my textures to them I saw an instant transformation in the look and feel of my scene.

One target I had was to give an eerie and astmospheric appearance to my scene, which would imply some of the emotion involved with my character. Being in a post-apocalyptic, wasteland environment, solitary from the rest of society, I wanted it to have an abandoned and ill kept feel coupled with the possibility of a threat from the inclusion of the damage and rubble. Some of the inspiration for this was from video games set in a similar environment. Even though these were all rather action incorporated I was still able to get an understanding of the look and feel of the environments with decaying structures and cobbled together objects.

The game "Dear Esther" had a substantial effect on some of the choices I decided to make during production. Even though it is under the game genre it is more of an interactive experience, or more likely a visual book. By this I mean that the only control of the game is movement, you don't have to kill anything or find anything, you just have to move and experience the environment and atmosphere, accompanied by snippets of a monologue, helping you to understand the real story behind the remote island you find yourself on. Subtle objects and structures are littered around the environment with no clear reason other than what is explained to you during the sections of narration.


The visual quality as well was stunning and really helped to add to the experience, similar to my environment with the inclusion of textures improving it greatly. Lighting in it was something I wanted to replicate with sections of the game being set in a cave, illuminated with a blue glow from the luminescent elements, drawing you towards them.

The volume lights in my scene had the desired effect I wanted to acheive with them giving an eerie appearance, with strong shadows and dramatic light rays seeping through the windows. The hope was to have them engulf the scenes with light from the outside, whilst the inside light sources were limited or had a small effect, making the outside seem more appealing than the dreary and dark confines of the building.

The one issue with my finished animation, recieved from feedback, is the lack of relevance when out of context. To someone who knows my character, the setting and overall effect I am trying to acheive with my environment it is obvious and easy to follow, however to someone unknowing, my animation is a tour of a dimly lit house with overturned furniture. There is no theme or iconic signature that defines my character like the bat for Batman or the S for Superman. My character doesn't have an underground lair where he keeps his costume and tech, nor a large ice structure in Antartica full of alien knowledge and devices. That to me is the only problem with my finished project. By trying to be against the grain and go in an alternative direction compared to other superhero characters, I have overlooked the need for something identifiable to symbolise my character. This still acheives my original intention of having a 'down to earth' character who doesn't have the flash base or tight outfit and is similar to my inspirations of games featuring a human character with heightened abilities, whilst not being deemed a superhero, still being able to do superhuman things.

Overall I am amazed with the quality of work I have produced for this project, in comparison to just a few years ago, making a poorly modelled, roughly textured, Mayan environment on 3Ds Max 2008 and still hope to expand my horizons with this and explore the possibilities available to me.

So without further ado, my finished animation:

Tuesday 21 February 2012

Robot Tutorial Model

Following a tutorial I had found, I produced this 3D robot character that although simple, allowed me to learn a variety of different tools available in 3Ds Max, enabling me to consider how to make complex shapes and structures from a single, simple shape via the implementation of said tools.


I hope that from further experimenting and tutorials I will be able to produce much more complex things and continue to applying textures to them.

Saturday 18 February 2012

Virtual Environments Experiment


From my first seminar on 3Ds Max I experimented with producing a ruined terrain piece that could be implemented into a post apocalyptic environment. From this test I found it easy to manipulate the object and shape it to give it a damaged appearance.


One intention I had when animating my scene was to give my camera a head bob effect as though you were looking from the perspective of my character, walking around the environment, making it appear more natural. By constraining a helper to a path and link the camera to this helper I was able to alter the z-axis at intermittent points to make it appear as though a character was jogging or walking quickly.


By altering the gap between the key frame points I could speed up or slow down the head bob to a desired pace, making it appear as though it's the first person perspective of my character walking through the environment.

Thursday 16 February 2012

Virtual Environment Concept


 A post-apocalyptic environment after a freak disaster, e.g. Nuclear Holocaust, Meteor Strike, Virus, with my character being one of the few survivors. Has a future setting with destroyed environments, survival being key, where there is a mutated threat or tribal/ bandit groups threatening survivors. Tools and other equipment are made from combining equipment scoured from the wasteland with a level of devolution having taken place due to lack of power and modern day technology.


Crumbling structures that are overgrown and rusting with living residences being slum-like, made from scraps of different things, e.g. car parts used for it, sheets of corrugated steel for walls etc. Shells of transport like trains altered into living places,  or small communities created around suitable, safe locations - Subway/ sewers, remote buildings.

Limited power or lighting, natural fire light used in certain areas - bandit or aggressive faction.

Working vehicles that have been customized to survive the wasteland - armoured with weapons attached, spikes.

Overall hostile environment with natural dangers e.g. radiation, mutants. 


Friday 10 February 2012

Blog Plug

You can see my first attempt at 3Ds Max 2012 since my first year at college on my other blog - http://icandrawstickmenalmost.blogspot.com/

Wednesday 1 February 2012

Animation Research

The Backwater Gospel - The Animation Workshop


Visual Essay- Practitioner Research, Tomasz Bagiński


Originally coming from an architectural studies background, Bagiński left this field to make movies. His first movie Rain (1998) won some local based awards that moved his career to working with Platige Image; a Warsaw based post-production company focusing on advanced animation and special effects for films. His first short film, The Cathedral (2002), took him three years to produce and received first prize at SIGGRAPH, an annual conference attended by computer professionals, held in the United States.
Fallen Art (2004), Bagiński’s second short film received several awards including another at the SIGGRAPH festival in 2005, making him the only artist to have received two main awards from it.
He has done a variety of other works including more short films and game cinematics as well as commercials for a variety of different companies.
His current project is a feature length film entitled Hardkor 44, a steampunk/ fantasy based story of the Warsaw Uprising.


From looking at his works I see some common themes within them. The environments he creates are always quite surreal and might have some inspiration from his architectural studies with the level of detail and design that they take, giving them sense to the structure, whilst still having an unrealistic appearance. In his films there is always a great deal of emotion effectively conveyed that grips the audience and makes them more than just a visual piece, but thought provoking as well. The works I have seen all have a deeper underlying message that is not apparent until there dramatic end, making them seem light hearted and comical at first e.g. Fallen Art, but have a moment of strong emotion through a combination of the visual and audio used that portrays the reality of the situation within it.

The main reason his work is both the level of detail as well as the effect it has on the audience, something that I hope to achieve in my own work by having it compelling and have an underlying message. The surrealism of his characters and environments is something I also like with it always having interested me and been something I have personally wanted to create.

Rain (1998)

The Cathedral (2004)

The Kinematograph (2009)

 An Animated History of Poland (2010)

The Witcher 2: Assassin of Kings - Intro (2011/12)

Sunday 29 January 2012

Visual Essay- 3D Animation Character Design


The main thing that appealed to me about animation are the characters themselves. Their exaggerated features that make their role in the animation instantly recognizable if something I find to be very effective in quickly giving a personality to a character in a short space of time. I can see similarities between this style and that of Pixar studios characters such as the Incredibles. 

Each character is recognizable for their individual physical appearance that in some cases is exaggerated to make it abundantly clear. This aspect of producing characters that are visually interesting and stylized in a caricaturist manner is something that has always appealed to me. One reason for this is their simplistic design that has a sense of humour to it, coupled with the animating style that complements the characters appearance with an exaggerated movement style that suits the visual style as a whole. For example, the Drown to Life animation has two characters, the small child character that has a scrawny body with a large head. His movement is very quick and nimble, which is something expected from a character of his style. Meanwhile the other character, the large, angry man has a much bulkier movement to him that reflects the character being big and overweight. However, even though both characters are very different in terms of their physical design, they both also move in a slapstick manner later in the animation with them bouncing around, fighting each other.
Fallen Art from Mata Leao on Vimeo.
This other animation also uses this exaggerated style for its characters, but also utilizes it for the environment and structures as well, with very elaborate contraptions and rickety tower buildings that would be impossible in reality. The emotion conveyed, much like the first one, is done very effectively without the used of words, but rather the facial expressions used. In the first animation they are all very exaggerated and comical and compliment the theme of it, however in 'Fallen Art', the second animation, each characters facial expression is much more detailed and realistic with slight sighs or audible cues narrating their emotion as well.

Friday 27 January 2012

Typography Research


I also looked into types of fonts that would be suitable for use in my website.

Calibri
Arial
Times New Roman
Verdana
Courier New

The above fonts could all be used for the majority of the text used as they are all very simple and clear to read. Personally I would want a san-serif font for my site. The fonts above are all useable through Dreamweaver and I believe are standard fonts used on the web, making it simpler to apply them without having to produce a graphic that contains the font.

Dimitri Swank
Segoe Script
Today
Vivaldi
Criticized

For my header text however I would prefer something much more stylized that gives the page a visual appeal. The above examples are just a few styles that might be useable, having both handwritten designs along with vector graphic style text. The issue with using these however would be both that I would be required to make a image for a header rather than typing the text because of the compatibility issues as well as it defining a style for the page I must adhere to.

Another reason I would consider using an image graphic made in Photoshop rather than typing in the text would be the amount of modifying I can do to it. Whilst it is possible to adjust the majority of the details in Dreamweaver it is still rather limited in the positioning of the text and the page and the vertical spacing of each word. An example below I made in Photoshop captures the style I want to use on my website and was simple to make by using the variety of text editing tools and freedom to move it wherever within the page. As long as the image matched the dimensions of the header itself it was simple to move the text into a position where it would be placed correctly on the actually webpage.